Search

Dark theme | Light theme
Showing posts with label IntelliJ. Show all posts

March 6, 2024

IntelliJ HTTP Client: Parsing JSON Web Tokens

The IntelliJ HTTP Client is very useful for testing APIs. We can use Javascript to look at the response and write tests with assertions about the response. If an API returns a JSON Web Token (JWT), we can use a Javascript function to decode the token and extract information from it. For example we can then assert that fields of the token have the correct value. There is no built-in support in IntelliJ HTTP Client to decode a JWT, but we can write our own Javascript function to do it. We then use the function in our Javascript response handler to decode the token.

In the following HTTP request file we simulate a call to get an response with a field containing an JWT. We use the function decodeJwt from the file jwt-utils.js to decode the token and extract information from it.

### Simulate a call to get an response with a field containing an JWT.
POST https://examples.http-client.intellij.net/anything
Content-Type: application/json

// Original token before it is base64 encoded:
// {
//     "sub": "1234567890",
//     "upn": "hubert@mrhaki.com",
//     "name": "mrhaki",
//     "groups": ["Blogger"],
//     "iat": 1516239022
// }
{
  "token": "eyJhbGciOiJIUzI1NiIsInR5cCI6IkpXVCJ9.eyJzdWIiOiIxMjM0NTY3ODkwIiwidXBuIjoiaHViZXJ0QG1yaGFraS5jb20iLCJuYW1lIjoibXJoYWtpIiwiZ3JvdXBzIjpbIkJsb2dnZXIiXSwiaWF0IjoxNTE2MjM5MDIyfQ.9E2gYNFogs3K8pJH9JiJYISv403EtCm4tRzQWZi1CXM"
}

> {%
    import {decodeJwt} from './scripts/jwt-utils';

    // The token is in the response body and we get it
    // using the path `json.token`.
    // We store it as variable `token` so we can use in the next step.
    const token = decodeJwt(response.body.json.token);

    // We can write assertions on the token contents.
    client.test("Check fields in token", function () {
        client.assert(token.upn === "hubert@mrhaki.com");
        client.assert(token.name === "mrhaki");
        client.assert(token.groups.includes("Blogger"));
        client.assert(token.sub === "1234567890");
        client.assert(token.iat === 1516239022);
    });
%}

The function decodeJwt is defined in the file jwt-utils.js:

// File: ./scripts/jwt-utils.js
export function decodeJwt(token) {
    var base64EncodedPayload = token.split('.')[1].replace(/-/g, '+').replace(/_/g, '/');
    var jsonPayload = decodeURIComponent(decodeBase64(base64EncodedPayload)
        .split('')
        .map(c => '%' + ('00' + c.charCodeAt(0).toString(16)).slice(-2))
        .join(''))
        // Remove any NUL characters at the end of the string.
        .replace(/\0+$/g, '');
    return JSON.parse(jsonPayload);
}

function decodeBase64(input) {
    const _keyStr = "ABCDEFGHIJKLMNOPQRSTUVWXYZabcdefghijklmnopqrstuvwxyz0123456789+/=";
    let output = "";
    let chr1, chr2, chr3;
    let enc1, enc2, enc3, enc4;
    let i = 0;
    input = input.replace(/[^A-Za-z0-9\+\/\=]/g, "");
    while (i < input.length) {
        enc1 = _keyStr.indexOf(input.charAt(i++));
        enc2 = _keyStr.indexOf(input.charAt(i++));
        enc3 = _keyStr.indexOf(input.charAt(i++));
        enc4 = _keyStr.indexOf(input.charAt(i++));
        chr1 = (enc1 << 2) | (enc2 >> 4);
        chr2 = ((enc2 & 15) << 4) | (enc3 >> 2);
        chr3 = ((enc3 & 3) << 6) | enc4;
        output = output + String.fromCharCode(chr1);
        if (enc3 !== 64) {
            output = output + String.fromCharCode(chr2);
        }
        if (enc4 !== 64) {
            output = output + String.fromCharCode(chr3);
        }
    }
    return decodeURI(output);
}

Written with IntelliJ IDEA 2023.3.4.

February 14, 2024

IntelliJ HTTP Client: Accessing Environment Variables In JavaScript

When we use the IntelliJ HTTP Client we can write JavaScript for the pre-request and response handlers. If we want to access an environment variable in JavaScript we can use request.environment.get(string). The argument for the get function is the name of the environment variable we want to get the value for. Environment variables can be defined in the file http-client.env.json or in http-client.private.env.json.

In the following example we have environment file http-client.env.json with two environments development and production. Each environment has a variable named project:

{
    "development": {
        "project": "DEV-1270"
    },
    "production": {
        "project": "PROJ-1234"
    }
}

In our .http request file we are posting to endpoint https://ijhttp-examples.jetbrains.com/anything and we use JavaScript to read the environment variable project:

### POST to example URL
< {%
    // Get value for environment variable 'project'.
    const project = request.environment.get("project");

    // Use split to get the value before and after the -.
    const kindAndNumber = project.split("-");

    // As an example we use the value of the environment variable
    // to assign values to new request variables.
    request.variables.set("kind", kindAndNumber[0]);
    request.variables.set("number", kindAndNumber[1]);
  %}
POST https://ijhttp-examples.jetbrains.com/anything

{
    "project": "{{project}}",
    "kind": "{{kind}}",
    "number": "{{number}}"
}

In the response we see the variables do have values:

...
"json": {
    "kind": "PROJ",
    "number": "1234",
    "project": "PROJ-1234"
  }
...

Written with IntelliJ IDEA 2023.3.3.

February 11, 2024

IntelliJ HTTP Client: Using In-Place Variables

The built-in IntelliJ HTTP Client is very useful for testing HTTP requests and responses. If we want to define a variable in our .http file that is only used in this file and will not change per environment we can define it using the following syntax: @<variable name> = variable value. The variable is an in-place variable and the scope of the variable in the current .http file. The variable is immutable and can only be defined with a value once and cannot be overwritten. To refer to the variable we use the syntax {{<variable name>}}.

In the following example we define a variable with the name base-url and the value https://ijhttp-example.jetbrains.com:

# We define an in-place variable "base-url"
# to be used in this file.
@base-url = https://ijhttp-examples.jetbrains.com

### GET HTML page
GET {{base-url}}/html

### GET XML page
GET {{base-url}}/xml

### GET JSON page
GET {{base-url}}/json

### GET UUID4 response
GET {{base-url}}/uuid

Written with IntelliJ 2023.3.3.

January 13, 2024

IntelliJ HTTP Client: Allowing Insecure HTTPS Requests

Sometimes we want to send HTTP requests to servers that use HTTPS with self-signed certificates. We then need to tell HTTP Client to not check the certificate of the server. This is like running the curl command with the --insecure or '-k' flag. To disable the certificate verification for HTTP Client we need to adjust the http-client.private.env.json file. For the environment we want to disable the certificate verification we must add a SSLConfiguration section. In the SSLConfiguration section we add the verifyHostCertificate property with value 'true'.

In the following example http-client.private.env.json file we have the environments development and production with different passwords. For the development environment we disable the certificate verification and we keep the certificate verification for the production environment.

{
  "development": {
    "password": "mrhaki",
    "SSLConfiguration": {
      "verifyHostCertificate": false
    }
  },
  "production": {
    "password": "mrhaki42"
  }
}

Written with IntelliJ 2023.3.2

November 16, 2023

Spring Sweets: Spring Boot 3 With Gradle In IntelliJ

Spring Boot 3 requires at least Java 17, but that also means the Java version used by Gradle must also be at least 17. Otherwise we will get the following error message when we build our Spring Boot project in IntelliJ using Gradle:

A problem occurred configuring root project 'springboot'.
> Could not resolve all files for configuration ':classpath'.
   > Could not resolve org.springframework.boot:spring-boot-gradle-plugin:3.1.5.
     Required by:
         project : > org.springframework.boot:org.springframework.boot.gradle.plugin:3.1.5
      > No matching variant of org.springframework.boot:spring-boot-gradle-plugin:3.1.5 was found. The consumer was configured to find a library for use during runtime, compatible with Java 11, packaged as a jar, and its dependencies declared externally, as well as attribute 'org.gradle.plugin.api-version' with value '8.4' but:
          - Variant 'apiElements' capability org.springframework.boot:spring-boot-gradle-plugin:3.1.5 declares a library, packaged as a jar, and its dependencies declared externally:
              - Incompatible because this component declares a component for use during compile-time, compatible with Java 17 and the consumer needed a component for use during runtime, compatible with Java 11
              - Other compatible attribute:
                  - Doesn't say anything about org.gradle.plugin.api-version (required '8.4')
          - Variant 'javadocElements' capability org.springframework.boot:spring-boot-gradle-plugin:3.1.5 declares a component for use during runtime, and its dependencies declared externally:
              - Incompatible because this component declares documentation and the consumer needed a library
              - Other compatible attributes:
                  - Doesn't say anything about its target Java version (required compatibility with Java 11)
                  - Doesn't say anything about its elements (required them packaged as a jar)
                  - Doesn't say anything about org.gradle.plugin.api-version (required '8.4')
          - Variant 'mavenOptionalApiElements' capability org.springframework.boot:spring-boot-gradle-plugin-maven-optional:3.1.5 declares a library, packaged as a jar, and its dependencies declared externally:
              - Incompatible because this component declares a component for use during compile-time, compatible with Java 17 and the consumer needed a component for use during runtime, compatible with Java 11
              - Other compatible attribute:
                  - Doesn't say anything about org.gradle.plugin.api-version (required '8.4')
          - Variant 'mavenOptionalRuntimeElements' capability org.springframework.boot:spring-boot-gradle-plugin-maven-optional:3.1.5 declares a library for use during runtime, packaged as a jar, and its dependencies declared externally:
              - Incompatible because this component declares a component, compatible with Java 17 and the consumer needed a component, compatible with Java 11
              - Other compatible attribute:
                  - Doesn't say anything about org.gradle.plugin.api-version (required '8.4')
          - Variant 'runtimeElements' capability org.springframework.boot:spring-boot-gradle-plugin:3.1.5 declares a library for use during runtime, packaged as a jar, and its dependencies declared externally:
              - Incompatible because this component declares a component, compatible with Java 17 and the consumer needed a component, compatible with Java 11
              - Other compatible attribute:
                  - Doesn't say anything about org.gradle.plugin.api-version (required '8.4')
          - Variant 'sourcesElements' capability org.springframework.boot:spring-boot-gradle-plugin:3.1.5 declares a component for use during runtime, and its dependencies declared externally:
              - Incompatible because this component declares documentation and the consumer needed a library
              - Other compatible attributes:
                  - Doesn't say anything about its target Java version (required compatibility with Java 11)
                  - Doesn't say anything about its elements (required them packaged as a jar)
                  - Doesn't say anything about org.gradle.plugin.api-version (required '8.4')

* Try:
> Run with --stacktrace option to get the stack trace.
> Run with --info or --debug option to get more log output.
> Run with --scan to get full insights.
> Get more help at https://help.gradle.org.

The issue is that the Spring Boot Gradle plugin 3.1.5 requires Java 17, but our project is using Java 11. We can fix this by explicitly setting the Java version that Gradle uses in IntelliJ. Go to Settings > Build, Execution, Deployment > Build Tools > Gradle and change the JVM used for Gradle to a JDK version of at least version 17.

Written with Spring Boot 3.1.5 and IntelliJ 2023.2.4.

November 5, 2023

IntelliJ HTTP Client: Using External Files As JSON Payload

The built-in IntelliJ HTTP Client is very useful for testing HTTP requests and responses. We can use it to test for example a REST API that works with JSON data. If an endpoint expects a JSON payload we can specify the payload in our HTTP Client request file. But if we have a lot of endpoints and large payload the request file can get big and messy. Instead of having the payload in the request file directly we can specify an external JSON file with the payload and use it for a request body. We must use the < operator and give the name of the file with our JSON payload. The IntelliJ HTTP Client will read the contents of that file and use it as the request body. The payload may also contain (dynamic) variables and those variables will be replaced with correct values when the request is executed.

In the following example we have a POST request with a JSON payload from an external file. The payload in the file contains variables. We use an endpoint from the test API at https://ijhttp-examples.jetbrains.com that expects a JSON payload. The response will contain the payload with request payload where all variables are replaced in the json property.

### POST to /anything with payload from external file
POST https://ijhttp-examples.jetbrains.com/anything
Content-Type: application/json

< ./sample-payload.json

# Content of sample-playload.json:
#{
#  "id": "{{$random.uuid}}",
#  "username": "{{username}}",
#}

# Content of http-client.env.json with value for variable username:
#{
#  "test": {
#    "username": "mrhaki"
#  }
#}

> {%
    client.test("Response is OK", function () {
        client.assert(response.status === 200);
    });
    client.test("Response has username set", function () {
        client.assert(response.body.json.username === "mrhaki");
    });
    client.test("Response has id with value", function () {
        const regexExp = /^[0-9a-f]{8}\b-[0-9a-f]{4}\b-[0-9a-f]{4}\b-[0-9a-f]{4}\b-[0-9a-f]{12}$/gi;
        client.assert(regexExp.test(response.body.json.id));
    });
%}

Written with IntelliJ IDEA 2023.2.4.

November 5, 2022

Add Import Statement Automatically For Unambiguous Java And Kotlin Classes In IntelliJ IDEA

I mostly use IntelliJ IDEA for my Java development work. Just the other day I got a tip from my colleague Willem Cheizoo I didn't use yet. In IntelliJ we can set the configuration option Add unambiguous imports on the fly. When we enable this option IntelliJ will automatically add an import statement for a Java class when the class name is only available from one package. The option is available from Preferences | Editor | General | Auto import:

The same dialog also has this setting for Kotlin source files.

In the following screenshot we see that IntelliJ provides the context option to add an import> for the class name Asciidoctor when the option Add unambiguous imports on the fly is disabled:

When we enable the option Add unambiguous imports on the fly the import statement is automatically added to our source file:

Written IntellIJ IDEA 2022.2.3.

October 27, 2017

Groovy Goodness: Download Grab Dependencies In IntelliJ IDEA

In our Groovy scripts we can use the @Grab annotation. With this annotation we define dependencies for our script and they will be automatically downloaded and added to the class path when we run our script. When we use IntelliJ IDEA we can use a nice intention that is part of the IntelliJ IDEA Groovy support to download the dependencies from our IDE editor. IDEA downloads the dependencies and add it to the project module dependencies. This is useful, because this will also adds code completion for the classes in the dependency to our editor.

Let's see this with a little example. We have the following Groovy script in our Groovy project in IntelliJ IDEA:

We place the cursor on the @Grab annotation and enable the intention popup using Alt+Enter (check Keymap Reference for the key combination). We select the option from the popup:

IntelliJ IDEA downloads the dependency. When we look at our Project Structure and at the Module Dependencies we see the downloaded dependency:

In our example we added the Groovy script to a Groovy project in IntelliJ IDEA. When the project is a Gradle or Maven project we must make sure Ivy is part of the compile class path, because otherwise IntelliJ IDEA cannot download the dependencies using this intention. For example we could add to a Gradle build file the following dependency compileOnly 'org.apache.ivy:ivy:2.4.0'.

Written with Groovy 2.4.12 and IntelliJ IDEA 2017.2.5

March 7, 2017

Gradle Goodness: Create Shortcut Key To Refresh Gradle Projects In IntellIJ IDEA

We can open a Gradle project in IntelliJ IDEA and get support for Gradle inside IntelliJ. Sometimes we need to refresh the project in IntelliJ IDEA, for example when we add a new dependency or plugin in our Gradle build file. We need to refresh the Gradle project so IntelliJ IDEA can work with the changes. The Gradle tool window has an icon to Refresh all Gradle projects. But this means a mouse action and we want to have a shortcut key so we can leave our hands on the keyboard.

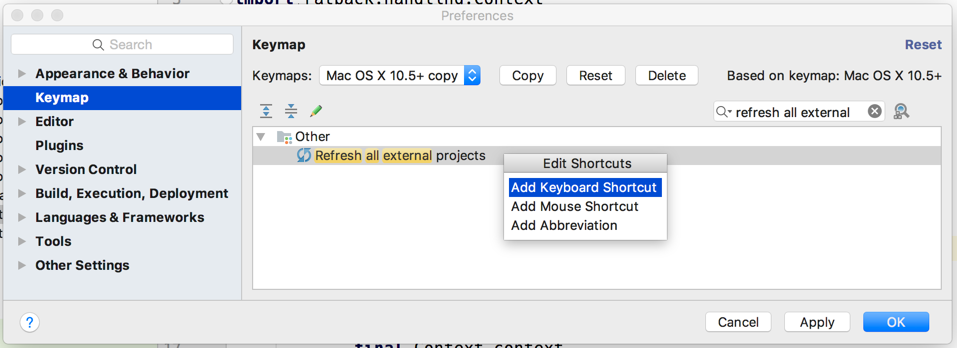
The action Refresh all Gradle projects is actually the action Refresh all external projects. We can add keyboard shortcut key via Preferences | Keymap. We use the search box to search for Refresh all external projects.

We can right click on the found action and select Add Keyboard Shortcut to define a new shortcut key:

Now we simply use the shortcut to refresh our Gradle project when we have made a change in the Gradle build file that IntelliJ IDEA should know about.

Besides have the action in the Gradle tool window we can also add it to the main toolbar. We right click on the main toolbar and select the option Customize Menus and Toolbars.... We can add the action Refresh all external projects here to the toolbar:

Written with Gradle 3.4.1 and IntelliJ IDEA 2016.3.4.

December 13, 2016

Gradle Goodness: Passing Environment Variable Via Delegate Run Action In IntelliJ IDEA

IntelliJ IDEA 2016.3 introduced the option to delegate the run action to Gradle. This means when we have a run Configuration for our Java or Groovy classes we can use the Run action and IDEA will use Gradle to run the application. Actually IntelliJ IDEA creates a new task of type JavaExec dynamically for our specific run configuration with the main property set to the class we want to run.

In the Edit Configuration dialog window we can set the command line argument and Java system properties. These are passed on to the dynamically created JavaExec task and are accessible from within the class that runs. The environment variables that can be set in the Edit Configuration dialog windows are not passed to the JavaExec task configuration. But we can do it ourselves in the build script file of our project. We look for the dynamically created task and use the environment method to add a environment variable that can be access in the Java or Groovy class that is executed.

We start our example with a simple Groovy class that can be executed using JavaExec. We simply print out the given input arguments, all Java system properties that start with sampleApp and finally all environment variables that start with SAMPLE_APP:

// File: src/main/groovy/mrhaki/gradle/SampleApp.groovy
package mrhaki.gradle

class SampleApp {

    static void main(final String[] args) {
        final app = new SampleApp()
        app.printArgs(args)
        app.printSystemProperties()
        app.printEnv()
    }

    void printArgs(final String[] args) {
        printSection 'Command line arguments', args
    }

    void printSystemProperties() {
        printSection 'System properties', System.properties.findAll(findNameStartsWith('sampleApp'))
    }

    void printEnv() {
        printSection 'environment', System.getenv().findAll(findNameStartsWith('SAMPLE_APP'))
    }
    
    private void printSection(final String title, final values) {
        println "--- $title ---"
        println values
    }

    private Closure findNameStartsWith(final String search) {
        { name, value -> name.startsWith(search) }
    }
    
}

We create a new Run/Debug Configuration for our SampleApp class:

When we click on OK to save the configuration we are ready to use the Run 'SampleApp' action. When we look at the output we get the following result:

10:54:29: Executing external task 'run SampleApp'...
:compileJava UP-TO-DATE
:compileGroovy 
:processResources UP-TO-DATE
:classes 
:run SampleApp
--- Command line arguments ---
[Execute via IDEA delegate to Gradle]
--- System properties ---
[sampleApp:Gradle Galore]
--- environment ---
[:]

BUILD SUCCESSFUL

Total time: 3.539 secs
10:54:33: External task execution finished 'run SampleApp'.

Notice the Gradle tasks that are invoked and the dynamically created run SampleApp task. We see our Java system property is passed on, together with the program arguments. The environment variable is not passed on. We must add some extra configuration to the dynamically created task run Sample in our build.gradle file:

// File: build.gradle
...
setEnvVarRunConfiguration 'SampleApp', 'SAMPLE_APP', 'Gradle environment variable'

/**
 * Add environment variable to JavaExec task
 * configuration created by IntelliJ IDEA
 * from a Run/Debug configuration.
 * 
 * @param configuration Name of IntelliJ IDEA Run/Debug configuration
 * @param envName Name of environment variable
 * @param envValue Value for environment variable
 */
def setEnvVarRunConfiguration(
        final String configuration, 
        final String envName, 
        final String envValue) {

    // Find task by type JavaExec and matching 
    // task name for configuration name.
    final javaExecRunConfiguration = { task -> 
        task instanceof JavaExec && task.name == "run $configuration"
    }
    
    tasks.matching(javaExecRunConfiguration).all {
        // Add environment variable to JavaExec 
        // task configuration.
        environment envName, envValue
    }
}
...

Now we re-run our application and we get the following output:

11:29:19: Executing external task 'run SampleApp'...
:compileJava UP-TO-DATE
:compileGroovy UP-TO-DATE
:processResources UP-TO-DATE
:classes UP-TO-DATE
:run SampleApp
--- Command line arguments ---
[Execute via IDEA delegate to Gradle]
--- System properties ---
[sampleApp:Gradle Galore]
--- environment ---
[SAMPLE_APP:Gradle environment variable]

BUILD SUCCESSFUL

Total time: 0.599 secs
11:29:19: External task execution finished 'run SampleApp'.

Written with IntelliJ IDEA 2016.3 and Gradle 3.2.1.

November 23, 2016

Gradle Goodness: Delegate Build And Run Actions To Gradle In IntelliJ IDEA

IntelliJ IDEA 2016.3 introduces the option to delegate the IDE build and run actions to Gradle. So if we invoke the Build Project action from the Build menu IntelliJ IDEA invokes the correct tasks using Gradle. Also the Run and Debug actions from the Run menu are executed with Gradle.

If we want this behaviour we need to changed the preferences of IntelliJ IDEA. We must open the preferences dialog window and then go to Build, Execution, Deployment | Build Tools | Gradle | Runner. Here we check the option Delegate IDE build/run actions to gradle and we close the window:

Let's open a simple Java project with a Gradle build file in IDEA. Next we invoke the Build Project action with the shortcut key Cmd+F9 (on macOS, other operating systems probably have a different shortcut key). Our code is compiled and we can open the Run view to see the output:

We have a Java class in our project with a main method we want to run. We use the Run action (for example using the shortcut key Ctrl+R on macOS) and IDEA uses Gradle's JavaExec task to run the class. Also this time we can see the output in the Run view:

Written with Gradle 3.2 and IntelliJ IDEA 2016.3.

June 17, 2016

Groovy Goodness: IntelliJ IDEA Formatting Of Closure Chains

When we write code with a lot of method chaining that involves closures and the use the Reformat code feature of IntelliJ IDEA things might get screwed up. Luckily we can changes some Groovy formatting rules in IntelliJ IDEA to prevent the reformatting.

In the following screenshot we see the original piece of code in the IntelliJ IDEA editor:

When we invoke Reformat code command we can have the following result where the code his not aligned anymore:

Let's set two options in the Preferences to keep the code formatted as is. We need to go to Editor | Code Style | Groovy. In the section Braces placement we enable the option Use flying geese braces:

In the section Chained method calls we enable the option Align when multiline:

Now when we reformat our original piece of code that alignment stays:

Written with IntelliJ IDEA 2016.1.

June 14, 2016

IntelliJ IDEA: How Productive Was Your Day?

If we want to see how productive we are with IntelliJ IDEA we must open Help | Productivity Guide. IntelliJ IDEA opens a dialog window with a very detailed overview of smart stuff we have been using. And how much typing we have saved.

Written with IntelliJ IDEA 2016.1.

March 18, 2016

Gradle Goodness: Source Sets As IntelliJ IDEA Modules

IntelliJ IDEA 2016.1 introduced better support for Gradle source sets. Each source set in our project becomes a module in the IntelliJ IDEA project. And each module has it's own dependencies, also between source sets. For example if we simply apply the java plugin in our project we already get two source sets: main and test. For compiling the test sources there is a dependency to the main source set. IntelliJ now knows how to handle this.

Let's create a sample Gradle build file with an extra custom source set and see what we get in IntelliJ IDEA. In the following example build file we add the source set api. This source set contains interfaces without implementations. The implementations for the interfaces are in the default main source set. Finally we have some tests in the test source set that depend on the classes generated by the api and main source sets.

apply plugin: 'groovy'
apply plugin: 'idea'

sourceSets {
    // Define new source set
    // with the name api. This 
    // source set contains interfaces,
    // implementation classes are in
    // the main source set.
    api
}

repositories {
    jcenter()
}

dependencies {

    // The default source set main
    // has a compile dependency on the 
    // output of the api source set.
    // Gradle will invoke the apiClasses
    // task automatically if we compile
    // the sources in the main source set.
    compile sourceSets.api.output
    
    testCompile 'org.spockframework:spock-core:1.0-groovy-2.4'
}

When we invoke the idea task to generate the IntelliJ IDEA project files or we import the build.gradle file into IDEA we can see in the Gradle tool window a new element: Source Sets. When we open the node we see all the source sets in our project with their dependencies:

When we right click on the project and select Open Module Settings we get a new dialog window. All source sets are separate modules grouped into a single module. In our example the module group is idea-sourcesets and it has three modules. If we click on the idea-sourcesets_test and select the Dependencies tab we see a list of dependencies for the source set:

Written with Gradle 2.12 and IntelliJ IDEA 2016.1.

March 16, 2016

Gradle Goodness: Enable Compiler Annotation Processing For IntelliJ IDEA

Suppose we have a project where we use Lombok annotations. To use it we must change the compiler configuration for our project and enable annotation processing. We can find this in the Preferences or Settings window under Build, Execution, Deployment | Compiler | Annotation Processors. Here we have a checkbox Enable annotation processing that we must check to use the annotations from IntelliJ IDEA. We can automate this setting with some configuration in our Gradle build file.

In the next example build file we alter the generated IntelliJ IDEA project file using the withXml hook. We can access the generated XML as a groovy.util.Node and change the XML.

// File: build.gradle
apply plugin: 'groovy'
apply plugin: 'idea'

repositories {
    jcenter()
}

dependencies {
    compile('org.projectlombok:lombok:1.16.6')
}

idea {
    project {
        ipr {
            withXml { provider ->
                // Get XML as groovy.util.Node to work with.
                def projectXml = provider.asNode()
                
                // Find compiler configuration component.
                def compilerConfiguration = projectXml.component.find { component ->
                    component.'@name' == 'CompilerConfiguration'
                }
                
                // Replace current annotationProcessing
                // that is part of the compiler configuration.
                def currentAnnotationProcessing = compilerConfiguration.annotationProcessing
                currentAnnotationProcessing.replaceNode {
                    annotationProcessing {
                        profile(name: 'Default', default: true, enabled: true) {
                            processorPath(useClasspath: true)
                        }
                    }
                }
            }
        }
    }
}

Written with Gradle 2.12 and IntelliJ IDEA 15.

Gradle Goodness: Add Spring Facet To IntelliJ IDEA Module

To create IntelliJ IDEA project files with Gradle we first need to apply the idea plugin. We can then further customise the created files. In this blog post we will add a Spring facet to the generated module file. By adding the Spring facet IntelliJ IDEA can automatically search for Spring configuration files. We can then use the Spring view to see which beans are configured in our project.

In the following example build file we use the withXml hook. This method is invoked just before the XML file is generated. We get an argument of type XmlProvider. From the XmlProvider we can access the XML as org.w3c.dom.Element, StringBuilder or groovy.util.Node. We use Node to alter the XML. We check if a FacetManager component is available. We need this to add a facet of type Spring.

// File: build.gradle
apply plugin: 'groovy'
apply plugin: 'idea'

idea {
    module {
        iml {
            withXml { 
                // Get root of module as groovy.util.Node.
                def moduleRoot = it.asNode()
                
                // Find if component with name 'FacetManager'
                // is already set.
                def facetManager = moduleRoot.component.find { component -> component.'@name' == 'FacetManager'}
                if (!facetManager) {
                    // Create new component with name 'FacetManager'
                    facetManager = moduleRoot.appendNode('component', [name: 'FacetManager'])
                }
                
                // Find Spring facet it might already be there.
                def springFacet = facetManager.facet.find { facet -> facet.'@type' == 'Spring' && facet.'@name' == 'Spring' }
                if (!springFacet) {
                    // If not set create new facet node with name 'Spring'
                    // and type 'Spring' and apply a default configuration.
                    springFacet = facetManager.appendNode('facet', [type: 'Spring', name: 'Spring'])
                    springFacet.appendNode('configuration')
                }
            }
        }
    }
}

Written with Gradle 2.12 and IntelliJ IDEA 15.

Gradle Goodness: Set VCS For IntelliJ IDEA In Build File

When we use the IDEA plugin in Gradle we can generate IntelliJ IDEA project files. We can customise the generated files in different ways. One of them is using a simple DSL to configure certain parts of the project file. With the DSL it is easy to set the version control system (VCS) used in our project.

In the next example build file we customise the generated IDEA project file and set Git as the version control system. The property is still incubating, but we can use it to have a proper configuration.

// File: build.gradle
apply plugin: 'groovy'
apply plugin: 'idea'

idea {
    project {
        // Set the version control system
        // to Git for this project.
        // All values IntelliJ IDEA supports
        // can be used. E.g. Subversion, Mercurial.
        vcs = 'Git'
    }
}

Written with Gradle 2.12 and IntelliJ IDEA 15.

Gradle Goodness: Configure IntelliJ IDEA To Use Gradle As Testrunner

When we run tests in IntelliJ IDEA the code is compiled by IntelliJ IDEA and the JUnit test runner is used. We get a nice graphical overview of the tasks that are executed and their results. If we use Gradle as the build tool for our project we can tell IntelliJ IDEA to always use Gradle for running tests.

We must open the Preferences or Settings dialog window. There we can search for Gradle and then look for Build, Execution, Deployment | Build Tools | Gradle | Runner:

We can select different values for the Run tests using option. The default value is Platform Test Runner. To use Gradle we select Gradle Test Runner. Finally we can choose for Let me choose per test. Let's select the option Gradle Test Runner and click on the OK button to close the dialog window.

Next we run our test code from the IDE:

The test is started using the Gradle tasks cleanTest and test with the option --tests with the name of our test class. In the Run window we can see how the test is executed and the graphical representation of the tests:

If we choose the option Let me choose per test then we must first select the runner if we run a test for the first time:

Our choice is remembered for next runs of the same test. We must delete the run configuration from Run | Edit configurations... if we want to choose the runner again.

Written with IntelliJ IDEA 15 and Gradle 2.12.

December 14, 2015

Change Font Size With Mouse In IntelliJ IDEA

We can change the font size in our editor using shortcut keys in IntelliJ IDEA. But we can also use our mouse wheel to do this. We must enable this option in the settings of IntelliJ IDEA. We select the Preferences and then General | Editor. Here we select the option Change font size (Zoom) with Command+Mouse Wheel:

Written with IntelliJ IDEA 15.

December 13, 2015

Grails Goodness: Quickly Create GSP From Controller In IntelliJ IDEA

If we have a action method in our controller and we want to create a corresponding GSP we can press Alt+Enter when the cursor is on the action method. IDEA shows the intention actions and one of them is Create view (GSP page).

We select this option and IntelliJ IDEA creates a view with the name of our action in the directory grails-app/views/{controllerName}:

Written with Grails 3.0.10 and IntelliJ IDEA 15.