Search

Dark theme | Light theme
Showing posts with label GradleGoodness:IDE. Show all posts

March 7, 2017

Gradle Goodness: Create Shortcut Key To Refresh Gradle Projects In IntellIJ IDEA

We can open a Gradle project in IntelliJ IDEA and get support for Gradle inside IntelliJ. Sometimes we need to refresh the project in IntelliJ IDEA, for example when we add a new dependency or plugin in our Gradle build file. We need to refresh the Gradle project so IntelliJ IDEA can work with the changes. The Gradle tool window has an icon to Refresh all Gradle projects. But this means a mouse action and we want to have a shortcut key so we can leave our hands on the keyboard.

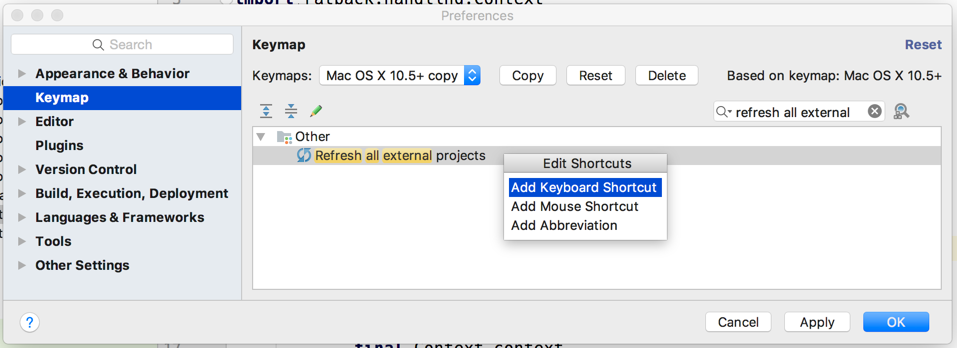
The action Refresh all Gradle projects is actually the action Refresh all external projects. We can add keyboard shortcut key via Preferences | Keymap. We use the search box to search for Refresh all external projects.

We can right click on the found action and select Add Keyboard Shortcut to define a new shortcut key:

Now we simply use the shortcut to refresh our Gradle project when we have made a change in the Gradle build file that IntelliJ IDEA should know about.

Besides have the action in the Gradle tool window we can also add it to the main toolbar. We right click on the main toolbar and select the option Customize Menus and Toolbars.... We can add the action Refresh all external projects here to the toolbar:

Written with Gradle 3.4.1 and IntelliJ IDEA 2016.3.4.

December 13, 2016

Gradle Goodness: Passing Environment Variable Via Delegate Run Action In IntelliJ IDEA

IntelliJ IDEA 2016.3 introduced the option to delegate the run action to Gradle. This means when we have a run Configuration for our Java or Groovy classes we can use the Run action and IDEA will use Gradle to run the application. Actually IntelliJ IDEA creates a new task of type JavaExec dynamically for our specific run configuration with the main property set to the class we want to run.

In the Edit Configuration dialog window we can set the command line argument and Java system properties. These are passed on to the dynamically created JavaExec task and are accessible from within the class that runs. The environment variables that can be set in the Edit Configuration dialog windows are not passed to the JavaExec task configuration. But we can do it ourselves in the build script file of our project. We look for the dynamically created task and use the environment method to add a environment variable that can be access in the Java or Groovy class that is executed.

We start our example with a simple Groovy class that can be executed using JavaExec. We simply print out the given input arguments, all Java system properties that start with sampleApp and finally all environment variables that start with SAMPLE_APP:

// File: src/main/groovy/mrhaki/gradle/SampleApp.groovy
package mrhaki.gradle

class SampleApp {

    static void main(final String[] args) {
        final app = new SampleApp()
        app.printArgs(args)
        app.printSystemProperties()
        app.printEnv()
    }

    void printArgs(final String[] args) {
        printSection 'Command line arguments', args
    }

    void printSystemProperties() {
        printSection 'System properties', System.properties.findAll(findNameStartsWith('sampleApp'))
    }

    void printEnv() {
        printSection 'environment', System.getenv().findAll(findNameStartsWith('SAMPLE_APP'))
    }
    
    private void printSection(final String title, final values) {
        println "--- $title ---"
        println values
    }

    private Closure findNameStartsWith(final String search) {
        { name, value -> name.startsWith(search) }
    }
    
}

We create a new Run/Debug Configuration for our SampleApp class:

When we click on OK to save the configuration we are ready to use the Run 'SampleApp' action. When we look at the output we get the following result:

10:54:29: Executing external task 'run SampleApp'...
:compileJava UP-TO-DATE
:compileGroovy 
:processResources UP-TO-DATE
:classes 
:run SampleApp
--- Command line arguments ---
[Execute via IDEA delegate to Gradle]
--- System properties ---
[sampleApp:Gradle Galore]
--- environment ---
[:]

BUILD SUCCESSFUL

Total time: 3.539 secs
10:54:33: External task execution finished 'run SampleApp'.

Notice the Gradle tasks that are invoked and the dynamically created run SampleApp task. We see our Java system property is passed on, together with the program arguments. The environment variable is not passed on. We must add some extra configuration to the dynamically created task run Sample in our build.gradle file:

// File: build.gradle
...
setEnvVarRunConfiguration 'SampleApp', 'SAMPLE_APP', 'Gradle environment variable'

/**
 * Add environment variable to JavaExec task
 * configuration created by IntelliJ IDEA
 * from a Run/Debug configuration.
 * 
 * @param configuration Name of IntelliJ IDEA Run/Debug configuration
 * @param envName Name of environment variable
 * @param envValue Value for environment variable
 */
def setEnvVarRunConfiguration(
        final String configuration, 
        final String envName, 
        final String envValue) {

    // Find task by type JavaExec and matching 
    // task name for configuration name.
    final javaExecRunConfiguration = { task -> 
        task instanceof JavaExec && task.name == "run $configuration"
    }
    
    tasks.matching(javaExecRunConfiguration).all {
        // Add environment variable to JavaExec 
        // task configuration.
        environment envName, envValue
    }
}
...

Now we re-run our application and we get the following output:

11:29:19: Executing external task 'run SampleApp'...
:compileJava UP-TO-DATE
:compileGroovy UP-TO-DATE
:processResources UP-TO-DATE
:classes UP-TO-DATE
:run SampleApp
--- Command line arguments ---
[Execute via IDEA delegate to Gradle]
--- System properties ---
[sampleApp:Gradle Galore]
--- environment ---
[SAMPLE_APP:Gradle environment variable]

BUILD SUCCESSFUL

Total time: 0.599 secs
11:29:19: External task execution finished 'run SampleApp'.

Written with IntelliJ IDEA 2016.3 and Gradle 3.2.1.

March 18, 2016

Gradle Goodness: Source Sets As IntelliJ IDEA Modules

IntelliJ IDEA 2016.1 introduced better support for Gradle source sets. Each source set in our project becomes a module in the IntelliJ IDEA project. And each module has it's own dependencies, also between source sets. For example if we simply apply the java plugin in our project we already get two source sets: main and test. For compiling the test sources there is a dependency to the main source set. IntelliJ now knows how to handle this.

Let's create a sample Gradle build file with an extra custom source set and see what we get in IntelliJ IDEA. In the following example build file we add the source set api. This source set contains interfaces without implementations. The implementations for the interfaces are in the default main source set. Finally we have some tests in the test source set that depend on the classes generated by the api and main source sets.

apply plugin: 'groovy'
apply plugin: 'idea'

sourceSets {
    // Define new source set
    // with the name api. This 
    // source set contains interfaces,
    // implementation classes are in
    // the main source set.
    api
}

repositories {
    jcenter()
}

dependencies {

    // The default source set main
    // has a compile dependency on the 
    // output of the api source set.
    // Gradle will invoke the apiClasses
    // task automatically if we compile
    // the sources in the main source set.
    compile sourceSets.api.output
    
    testCompile 'org.spockframework:spock-core:1.0-groovy-2.4'
}

When we invoke the idea task to generate the IntelliJ IDEA project files or we import the build.gradle file into IDEA we can see in the Gradle tool window a new element: Source Sets. When we open the node we see all the source sets in our project with their dependencies:

When we right click on the project and select Open Module Settings we get a new dialog window. All source sets are separate modules grouped into a single module. In our example the module group is idea-sourcesets and it has three modules. If we click on the idea-sourcesets_test and select the Dependencies tab we see a list of dependencies for the source set:

Written with Gradle 2.12 and IntelliJ IDEA 2016.1.

March 16, 2016

Gradle Goodness: Enable Compiler Annotation Processing For IntelliJ IDEA

Suppose we have a project where we use Lombok annotations. To use it we must change the compiler configuration for our project and enable annotation processing. We can find this in the Preferences or Settings window under Build, Execution, Deployment | Compiler | Annotation Processors. Here we have a checkbox Enable annotation processing that we must check to use the annotations from IntelliJ IDEA. We can automate this setting with some configuration in our Gradle build file.

In the next example build file we alter the generated IntelliJ IDEA project file using the withXml hook. We can access the generated XML as a groovy.util.Node and change the XML.

// File: build.gradle
apply plugin: 'groovy'
apply plugin: 'idea'

repositories {
    jcenter()
}

dependencies {
    compile('org.projectlombok:lombok:1.16.6')
}

idea {
    project {
        ipr {
            withXml { provider ->
                // Get XML as groovy.util.Node to work with.
                def projectXml = provider.asNode()
                
                // Find compiler configuration component.
                def compilerConfiguration = projectXml.component.find { component ->
                    component.'@name' == 'CompilerConfiguration'
                }
                
                // Replace current annotationProcessing
                // that is part of the compiler configuration.
                def currentAnnotationProcessing = compilerConfiguration.annotationProcessing
                currentAnnotationProcessing.replaceNode {
                    annotationProcessing {
                        profile(name: 'Default', default: true, enabled: true) {
                            processorPath(useClasspath: true)
                        }
                    }
                }
            }
        }
    }
}

Written with Gradle 2.12 and IntelliJ IDEA 15.

Gradle Goodness: Add Spring Facet To IntelliJ IDEA Module

To create IntelliJ IDEA project files with Gradle we first need to apply the idea plugin. We can then further customise the created files. In this blog post we will add a Spring facet to the generated module file. By adding the Spring facet IntelliJ IDEA can automatically search for Spring configuration files. We can then use the Spring view to see which beans are configured in our project.

In the following example build file we use the withXml hook. This method is invoked just before the XML file is generated. We get an argument of type XmlProvider. From the XmlProvider we can access the XML as org.w3c.dom.Element, StringBuilder or groovy.util.Node. We use Node to alter the XML. We check if a FacetManager component is available. We need this to add a facet of type Spring.

// File: build.gradle
apply plugin: 'groovy'
apply plugin: 'idea'

idea {
    module {
        iml {
            withXml { 
                // Get root of module as groovy.util.Node.
                def moduleRoot = it.asNode()
                
                // Find if component with name 'FacetManager'
                // is already set.
                def facetManager = moduleRoot.component.find { component -> component.'@name' == 'FacetManager'}
                if (!facetManager) {
                    // Create new component with name 'FacetManager'
                    facetManager = moduleRoot.appendNode('component', [name: 'FacetManager'])
                }
                
                // Find Spring facet it might already be there.
                def springFacet = facetManager.facet.find { facet -> facet.'@type' == 'Spring' && facet.'@name' == 'Spring' }
                if (!springFacet) {
                    // If not set create new facet node with name 'Spring'
                    // and type 'Spring' and apply a default configuration.
                    springFacet = facetManager.appendNode('facet', [type: 'Spring', name: 'Spring'])
                    springFacet.appendNode('configuration')
                }
            }
        }
    }
}

Written with Gradle 2.12 and IntelliJ IDEA 15.

Gradle Goodness: Set VCS For IntelliJ IDEA In Build File

When we use the IDEA plugin in Gradle we can generate IntelliJ IDEA project files. We can customise the generated files in different ways. One of them is using a simple DSL to configure certain parts of the project file. With the DSL it is easy to set the version control system (VCS) used in our project.

In the next example build file we customise the generated IDEA project file and set Git as the version control system. The property is still incubating, but we can use it to have a proper configuration.

// File: build.gradle
apply plugin: 'groovy'
apply plugin: 'idea'

idea {
    project {
        // Set the version control system
        // to Git for this project.
        // All values IntelliJ IDEA supports
        // can be used. E.g. Subversion, Mercurial.
        vcs = 'Git'
    }
}

Written with Gradle 2.12 and IntelliJ IDEA 15.

Gradle Goodness: Configure IntelliJ IDEA To Use Gradle As Testrunner

When we run tests in IntelliJ IDEA the code is compiled by IntelliJ IDEA and the JUnit test runner is used. We get a nice graphical overview of the tasks that are executed and their results. If we use Gradle as the build tool for our project we can tell IntelliJ IDEA to always use Gradle for running tests.

We must open the Preferences or Settings dialog window. There we can search for Gradle and then look for Build, Execution, Deployment | Build Tools | Gradle | Runner:

We can select different values for the Run tests using option. The default value is Platform Test Runner. To use Gradle we select Gradle Test Runner. Finally we can choose for Let me choose per test. Let's select the option Gradle Test Runner and click on the OK button to close the dialog window.

Next we run our test code from the IDE:

The test is started using the Gradle tasks cleanTest and test with the option --tests with the name of our test class. In the Run window we can see how the test is executed and the graphical representation of the tests:

If we choose the option Let me choose per test then we must first select the runner if we run a test for the first time:

Our choice is remembered for next runs of the same test. We must delete the run configuration from Run | Edit configurations... if we want to choose the runner again.

Written with IntelliJ IDEA 15 and Gradle 2.12.

September 30, 2015

Gradle Goodness: Download Javadoc Files For Dependencies In IDE

Gradle has an idea and eclipse plugin that we can use to configure IntelliJ IDEA and Eclipse project files. When we apply these plugins to our project we get extra tasks to generate and change project files. Inside our Gradle build file we get new configuration blocks to specify properties or invoke methods that will change the configuration files. One of the nice things to add is to let the IDE download Javadoc files for dependencies in our Java/Groovy projects. By default the sources for a dependency are already downloaded and added to the project, but Javadoc files are not downloaded.

In the example build file we use the idea and eclipse plugins. We also add an idea and eclipse configuration block. The place where we need to set the property downloadJavadoc is a bit different, but the end result will be the same.

// File: build.gradle
apply {
    plugin 'java'
    plugin 'idea'
    plugin 'eclipse'
}

idea {
    module {
        downloadJavadoc = true
    }
}

eclipse {
    classpath {
        downloadJavadoc = true
    }
}

repositories {
    jcenter()
}

dependencies {
    compile 'org.springframework:spring-context:4.2.1.RELEASE'
}

For example to create the correct files for IntelliJ IDEA we run the task idea. For an existing build file, we can select the Refresh all Gradle projects icon from the Gradle view and IDEA will download missing Javadoc files for the dependencies in our project. In the project file we see for example the location of the Javadoc JAR files:

...
<library name="Gradle: org.springframework:spring-beans:4.2.1.RELEASE">
  <CLASSES>
    <root url="jar://$USER_HOME$/.gradle/caches/modules-2/files-2.1/org.springframework/spring-beans/4.2.1.RELEASE/6d39786b9f7b2a79897a0a83495f30002d9f8de3/spring-beans-4.2.1.RELEASE.jar!/" />
  </CLASSES>
  <JAVADOC>
    <root url="jar://$USER_HOME$/.gradle/caches/modules-2/files-2.1/org.springframework/spring-beans/4.2.1.RELEASE/d7789802c418cd04462f0e2f00cf812912bea33d/spring-beans-4.2.1.RELEASE-javadoc.jar!/" />
  </JAVADOC>
  <SOURCES>
    <root url="jar://$USER_HOME$/.gradle/caches/modules-2/files-2.1/org.springframework/spring-beans/4.2.1.RELEASE/5d017016084ccea18af667cf65e2927800967452/spring-beans-4.2.1.RELEASE-sources.jar!/" />
  </SOURCES>
</library>
...

When we run the eclipse task all Eclipse project files are generated. If we look in the generated .classpath file we see for example that the location for the Javadoc files is added:

...
<classpathentry sourcepath="/Users/mrhaki/.gradle/caches/modules-2/files-2.1/org.springframework/spring-context/4.2.1.RELEASE/676729ef55bb886663ed5454eb61d119ef712f17/spring-context-4.2.1.RELEASE-sources.jar" kind="lib" path="/Users/mrhaki/.gradle/caches/modules-2/files-2.1/org.springframework/spring-context/4.2.1.RELEASE/5bf6dec08e77755c2ec913fde1b8e29083e70a76/spring-context-4.2.1.RELEASE.jar">
    <attributes>
        <attribute name="javadoc_location" value="jar:file:/Users/mrhaki/.gradle/caches/modules-2/files-2.1/org.springframework/spring-context/4.2.1.RELEASE/8d9edd93ea9d918b0895eb6fd4d1c69b301de449/spring-context-4.2.1.RELEASE-javadoc.jar!/"/>
    </attributes>
</classpathentry>

...

Written with Gradle 2.7.

August 27, 2015

Gradle Goodness: Quickly Open Test Report in IntelliJ IDEA

When we execute a Gradle test task in IntelliJ IDEA the IDE test runner is used. This means we can get a nice overview of all tests that have run. If a test is successful we get a green light, otherwise it is red in case of an error or orange in case of a failure. Gradle also generates a nice HTML report when we run the test task. It is placed in the directory build/reports/tests/. IntelliJ IDEA has a button which opens this report when we click on it. The following screenshot shows the button with the tooltip that opens a Gradle test report:

Written with IntelliJ IDEA 14 and Gradle 2.6.