Search

Dark theme | Light theme
Showing posts with label IDEA. Show all posts

October 27, 2017

Groovy Goodness: Download Grab Dependencies In IntelliJ IDEA

In our Groovy scripts we can use the @Grab annotation. With this annotation we define dependencies for our script and they will be automatically downloaded and added to the class path when we run our script. When we use IntelliJ IDEA we can use a nice intention that is part of the IntelliJ IDEA Groovy support to download the dependencies from our IDE editor. IDEA downloads the dependencies and add it to the project module dependencies. This is useful, because this will also adds code completion for the classes in the dependency to our editor.

Let's see this with a little example. We have the following Groovy script in our Groovy project in IntelliJ IDEA:

We place the cursor on the @Grab annotation and enable the intention popup using Alt+Enter (check Keymap Reference for the key combination). We select the option from the popup:

IntelliJ IDEA downloads the dependency. When we look at our Project Structure and at the Module Dependencies we see the downloaded dependency:

In our example we added the Groovy script to a Groovy project in IntelliJ IDEA. When the project is a Gradle or Maven project we must make sure Ivy is part of the compile class path, because otherwise IntelliJ IDEA cannot download the dependencies using this intention. For example we could add to a Gradle build file the following dependency compileOnly 'org.apache.ivy:ivy:2.4.0'.

Written with Groovy 2.4.12 and IntelliJ IDEA 2017.2.5

November 23, 2016

Gradle Goodness: Delegate Build And Run Actions To Gradle In IntelliJ IDEA

IntelliJ IDEA 2016.3 introduces the option to delegate the IDE build and run actions to Gradle. So if we invoke the Build Project action from the Build menu IntelliJ IDEA invokes the correct tasks using Gradle. Also the Run and Debug actions from the Run menu are executed with Gradle.

If we want this behaviour we need to changed the preferences of IntelliJ IDEA. We must open the preferences dialog window and then go to Build, Execution, Deployment | Build Tools | Gradle | Runner. Here we check the option Delegate IDE build/run actions to gradle and we close the window:

Let's open a simple Java project with a Gradle build file in IDEA. Next we invoke the Build Project action with the shortcut key Cmd+F9 (on macOS, other operating systems probably have a different shortcut key). Our code is compiled and we can open the Run view to see the output:

We have a Java class in our project with a main method we want to run. We use the Run action (for example using the shortcut key Ctrl+R on macOS) and IDEA uses Gradle's JavaExec task to run the class. Also this time we can see the output in the Run view:

Written with Gradle 3.2 and IntelliJ IDEA 2016.3.

June 17, 2016

Groovy Goodness: IntelliJ IDEA Formatting Of Closure Chains

When we write code with a lot of method chaining that involves closures and the use the Reformat code feature of IntelliJ IDEA things might get screwed up. Luckily we can changes some Groovy formatting rules in IntelliJ IDEA to prevent the reformatting.

In the following screenshot we see the original piece of code in the IntelliJ IDEA editor:

When we invoke Reformat code command we can have the following result where the code his not aligned anymore:

Let's set two options in the Preferences to keep the code formatted as is. We need to go to Editor | Code Style | Groovy. In the section Braces placement we enable the option Use flying geese braces:

In the section Chained method calls we enable the option Align when multiline:

Now when we reformat our original piece of code that alignment stays:

Written with IntelliJ IDEA 2016.1.

December 14, 2015

Change Font Size With Mouse In IntelliJ IDEA

We can change the font size in our editor using shortcut keys in IntelliJ IDEA. But we can also use our mouse wheel to do this. We must enable this option in the settings of IntelliJ IDEA. We select the Preferences and then General | Editor. Here we select the option Change font size (Zoom) with Command+Mouse Wheel:

Written with IntelliJ IDEA 15.

December 13, 2015

Grails Goodness: Go To Related Classes In IntelliJ IDEA

Normally in a Grails application we have classes that are related to each other, but are located in different directories. For example a controller with several views. Or a Grails service with corresponding specifications. In IntelliJ IDEA we can use Choose Target and IDEA will show classes, files and methods that are relevant for the current file we are editing. The keybinding on my Mac OSX is Ctrl+Cmd+Up, but can be different on your computer and operating system. We can also choose the menu option Navigate | Related symbol....

In the following example we are editing the file MessagesController. We select the action Choose Target, IntelliJ IDEA shows a popup menu with the views for this controller and the specification class:

Or if we are editing a view and select the menu option Navigate | Related symbol.... Now we can navigate to the controller, method in the controller and other views:

Written with Grails 3.0.10 and IntelliJ IDEA 15.

September 21, 2015

Groovy Goodness: Turn Map Into Class With IntelliJ IDEA

IntelliJ IDEA has very good Groovy support. It also provides some intentions especially for the Groovy language. For example we can turn a map definition into a Groovy class definition with a few simple clicks.

The following screenshot shows a simple map declaration with two keys: username and alias. If we use the shortcut for intentions (Alt+Enter on my computer) we can choose the Convert to Class option:

IDEA opens a new dialog window where we can type the name of the class we want to generate and a package name:

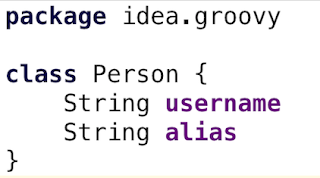
When we click the OK button IDEA generates a new Groovy class file in our project:

Also our original source where we declared the map is changed. Now the constructor of the new class is declared and the original values from the map are assigned to the correct properties of the class:

Written with IntelliJ IDEA CE 14.1.4.

May 8, 2014

Easy Editing ResourceBundle Property Files in IntelliJ IDEA

We can add a resourcebundle property file to our application to support internationalization (i18n). The file contains key-value pairs where the value is a localized value per supported language or locale. In IntelliJ IDEA we can easily see which keys are not yet translated. We open a resourcebundle property file and click on the ResourceBundle tab at the bottom of the editor. We get a list of all available keys on the left and on the right a text area per supported language with the translated values. If a key is not translated for all supported languages it will be colored in red. We only have to select the keys in red and fill in the values on the right for the given languages.

Sample with IntelliJ IDEA 13.1.1

April 11, 2014

Coloring Different Data Sources in IntelliJ IDEA

The database plugin in IntelliJ IDEA is a useful tool to work with data in databases. As long as we got a JDBC driver to connect to the database we can configure a data source. And then we can run queries, inspect the contents of tables and change data with the database tool window. It is not uncommon to have multiple data sources, for example development and test environment databases, which will have the same tables. When we open the tables or run queries we don't have a visual feedback to see to which data source such a table belongs. To have a visual feedback we can colorize our data source. This means we assign a color to a data source and when we open a table from that data source the tab color in the editor window will have a different color than other tabs or the background color of the data source objects have a color.

To add a color to a data source we must open the database tool window and right click on a data source. We select the option Color Settings... from the popup window:

Next a new dialog opens where we can select a color:

We can make a selection for one of the predefined colors or create a custom color we want to use. Also we can select in the Appearance Settings where in IntelliJ IDEA the colored data source must appear. We click on the OK button to save our settings. We can repeat these steps for other data sources and given them different colors.

Once we have added color to our data source we can see for example in the tabs of our editor window the different colors:

Or when we open the data sources in the database tool window to get a list of all objects in the data source:

Even we open a dialog to see recently changed files we can see the colorized data source objects:

Sample with IntelliJ IDEA 13.1.1

March 14, 2014

Change Font Terminal Tool Window in IntelliJ IDEA

IntelliJ IDEA 13 added the Terminal tool window to the IDE. We can open a terminal window with Tools | Open Terminal.... To change the font of the terminal we must open the preferences and select IDE Settings | Editor | Colors & Fonts | Console Font. Here we can choose a font and change the font size:

December 11, 2013

Grails Goodness: Debugging App in Forked Mode

Since Grails 2.2 by default the run-app command will launch the Grails application in a separate Java Virtual Machine. This is called forked Tomcat execution in Grails. This way the class path of the Grails build system and the application will not intervene and also both processes will have their own memory settings. We can see the settings in grails-app/conf/BuildConfig.groovy where we find the configuration property grails.project.fork.run. When we want to debug our application in an IDE like IntelliJ IDEA we cannot use the Debug command, because this will only allow us to debug the Grails build system. We will not reach breakpoints in our source code. But Grails 2.3 introduces an extra argument for the run-app command: --debug-fork. If we use this extra argument the JVM running the Grails application will stop and listen for a debug session to be attached and then continue. We can configure a Debug configuration in IntelliJ IDEA (or another IDE) to attach to the waiting Grails application and use breakpoints and other debugging tools like we are used to.

Suppose we have a Grails application named forked-debug and we have created a project in IDEA for this application. We click on the Select Run/Debug Configuration button and select Edit Configurations...:

IDEA opens a dialog where we can change the Grails command and set JVM options. We add the option --debug-fork to the Command Line field in this dialog:

We click the OK button to save our change and close the dialog window. Next we can run our Grails application using our changed run configuration:

IDEA starts our application in the console window we can see Listening for transport dt_socket at address: 5005:

Now it is time to create a new debug configuration. We click on the Select Run/Debug Configuration button again and select Edit Configurations.... We add a new type of configuration, so we click on the + sign and type Remote:

We select the Remote type and the dialog window shows now a lot of input fields which we can leave to the default values. It is good to given this configuration a new name, for example Grails:forked-debug (debug):

We click the OK button to close the dialog window. Our Grails application is still waiting for a debug session to be attached, so we use our new configuration with the Debug button:

In the console window of our Grails application we can see the application is now continuing to start and finally we can reach the application via our web browser. We can now place breakpoints in our source code and when we hit them we can use all debugging tools from IDEA:

We could also have used the argument --debug-fork from a command-line and then use the IDEA debug configuration to attach to that instance of the Grails application.

Code written with Grails 2.3.4 and IntelliJ IDEA 13 is used.

May 28, 2013

Groovy Goodness: @DelegatesTo For Type Checking DSL

Groovy 2.1 introduced the @DelegatesTo annotation. With this annotation we can document a method and tell which class is responsible for executing the code we pass into the method. If we use @TypeChecked or @CompileStatic then the static type checker of the compiler will use this information to check at compile-time if the code is correct. And finally this annotation allows an IDE to give extra support like code completion.

Suppose we have the following class Reservation with the method submit(). The method accepts a closure with methods that need to be applied with the instance of the Reservation class. This is a very common pattern for writing simple DSLs in Groovy.

class Reservation {
    private Date date
    private String event
    private String attendee
    
    void date(final Date date) { this.date = date }
    void event(final String event) { this.event = event }
    void attendee(final String attendee) { this.attendee = attendee }
    
    /** Submit a reservation. 
      * @param config Configuration for reservation, invoking method class on Reservation.
      */
    static void submit(final Closure config) {
        final Reservation reservation = new Reservation()
        reservation.with config
    }

}

class Event {
    /** Use Reservation configuration DSL to submit a reservation. */
    void submitReservation() {
        Reservation.submit {
            date Date.parse('yyyyMMdd', '20130522')
            event 'Gr8Conf'
            attendee 'mrhaki'
            reserved true
        }
    }
}

final event = new Event()
event.submitReservation()

When we look at the code we might already see there is an error. In the Event.submitReservation() method we have the line reserved true, which will try to invoke the reserve() method of the Reservation class. But that method is not defined. When we run the application we get the expected error:

Exception thrown
May 28, 2013 6:58:36 AM org.codehaus.groovy.runtime.StackTraceUtils sanitize
WARNING: Sanitizing stacktrace:
groovy.lang.MissingMethodException: No signature of method: Reservation.reserved() is applicable for argument types: (java.lang.Boolean) values: [true]

To get an error for this line at compile-time we must add some annotation so the Groovy compiler can do static type checking on our code. We change the code and get the following sample:

import groovy.transform.*

class Reservation {
    private Date date
    private String event
    private String attendee
    
    void date(final Date date) { this.date = date }
    void event(final String event) { this.event = event }
    void attendee(final String attendee) { this.attendee = attendee }
    
    /** Submit a reservation. 
      * @param config Configuration for reservation, invoking method class on Reservation.
      */
    static void submit(@DelegatesTo(Reservation) final Closure config) {
        final Reservation reservation = new Reservation()
        reservation.with config
    }

}

@TypeChecked
// @CompileStatic - will also do static type checking
class Event {
    /** Use Reservation configuration DSL to submit a reservation. */
    void submitReservation() {
        Reservation.submit {
            date Date.parse('yyyyMMdd', '20130522')
            event 'Gr8Conf'
            attendee 'mrhaki'
            reserved true
        }
    }
}

final event = new Event()
event.submitReservation()

When the code is compiled we immediately get a compilation error:

1 compilation error:

[Static type checking] - Cannot find matching method Event#reserved(boolean). Please check if the declared type is right and if the method exists.
 at line: 26, column: 13

Wow, this useful! We find errors in our DSL before the code is run.

When we create this code in an IDE like IntelliJ IDEA we also get code completion in the Reservation.submit() method invocation in the Event class. The following screenshot shows code completion and a red font for reserved to indicate the compilation error.


Code written in Groovy 2.1.3