Search

Dark theme | Light theme
Showing posts with label NetBeans:Samples. Show all posts

November 19, 2009

Start or Don't Start Web Browser When Running a Grails App in NetBeans

NetBeans opens a web browser with the index page of our Grails application if we run the application. If we don't want this behaviour or if we turned it off, but want to turn it on again, we right-click on the project in the Project window and select Properties. We click on the General Settings node and we check or uncheck Display Browser on Run.

We close the dialog window by clicking on the OK button. Next time when we run the Grails application the web browser will be shown or not depending on the choice we made in the dialog window.

November 18, 2009

Change Grails Environment in NetBeans

In NetBeans we can change the Grails environment to development, test or production for an application. We right-click on the Grails project in the Project window and select Properties. In the dialog window we select General Settings and on the right we see a combobox for Active Grails Environment. Here we can select an environment. If we defined our environment it is not shown in this list, so we can only select one of the three default environments.

We click on the OK button to activate our choice for the application.

Change Server Port for Grails App in NetBeans

We can change the port number for the server running our Grails application. We right-click on the project in the Project window and select Properties. We get a dialog window and select the General Settings node. We set the server port in the field Server Port. The default value is 8080, but we can change it to another value if we want.

We click on the OK button to close the dialog window. Next time we run our Grails application the server is started with the new server port.

November 17, 2009

Installing Grails Plugins in NetBeans

If we have a Grails project in NetBeans we can add plugins by right-clicking on the project in the Project window and selecting Grails Plugins....

NetBeans opens a dialog window with two tabs. The first tab, Installed, contains the plugins already installed in our application. The second tab, New plugins, shows all available plugins from the Grails plugin repository.

We can search in the list by typing the first characters of the name of the plugin. To install a plugin we must select the name and click on the Install button. If we have a plugin on our local file system we can use the Browse... button to locate the plugin and install it. In our sample we install the joda-time plugin:

After installation we return to the Installed tab and see the joda-time plugin is added to the list.

Now we can close the dialog window and return to our code. The Joda Time classes are now available in our code:

November 16, 2009

Create New Grails Files in NetBeans

To add a new file to our Grails application in NetBeans we simply select File | New (Ctrl+N in Windows) while we have a Grails application open. NetBeans opens a new dialog and if we select the Groovy node we get a list of Grails filetypes we can select. NetBeans provides templates for these types or uses the Grails commands to create a new file to get a good start. For most filetypes we only have to specify the name and package, but for more general filetypes we can also define the location in the Grails directory structure.

We can also right-click on a node in our Grails application in the Project window. NetBeans has a context-sentive pop-up menu and if we select New... we see the most relevant Grails types for that node at the top. So if we right-click on the Domain Classes node we get the Grails Domain Class... option at the top.

Create a Grails Project in NetBeans

To get started with Grails in NetBeans is easy once we have added the Groovy and Grails plugin. We select File | New Project and Groovy from the Categories. Now we select Grails Application and press the Next button:

On the next screen of the wizard we type the name of our Grails project and the location. And if we didn't define a Grails home directory for NetBeans yet we can do it by clicking on the Configure Grails... button.

If we clicked on the Configure Grails... button we get the following dialog to enter the directory of our Grails installation. We can also set the Grails installation directory if we go to Tools | Options | Miscellaneous | Groovy:

After we have set the Grails installation directory we close the dialog window and finish the New project wizard. NetBeans creates the new project and in our Project window we see the layout of our Grails application. We are now ready to add files to the project and start developing.

Running Grails Commands in NetBeans

NetBeans has some great support for developing Grails applications. We can run an arbitrary Grails command by right-clicking on the project and select Run Grails Command... from the pop-up menu. NetBeans opens a dialog where we can type in the command we want to use with parameters if needed.

To get quick access to this dialog we can assign our own shortcut key combination to the command. We go to Tools | Options | Keymap. In the Search field we type run grails and we get the Run Grails Command... in the Actions list. We click on the ... button to assign our own shortcut key combination (I choose Ctrl+Shift+G).

We close the Options window and now we can press our shorcut key combination and we can run Grails commands immediately.

Add Groovy and Grails Support to NetBeans

To enhance NetBeans with Groovy and Grails support we add the Groovy and Grails plugin to the IDE. We select Tools | Plugins and go to the Available Plugins tab. We type Grails in the Search field to look for the plugin. We select the plugin and press the Install button.

NetBeans downloads the plugin and installs it. After the installation we can restart the IDE to enable the plugin. As a last step we configure the plugin by specifying the Grails installation directory. We go to Tools | Options | Miscellaneous | Groovy and set the Grails home directory in Grails Home:

NetBeans is now setup to create Grails applications.

August 27, 2009

Copy Resources in NetBeans Java Project

When we need to copy resources in our Java project to the build directory, we have to extend the project's build.xml file. Suppose we have a default Java project in NetBeans. We create a new directory resources in the project directory. Here we place properties files, images or anything else we think is a resource and doesn't need to be compiled. We open build.xml and add the following ANT targets:

<target name="-post-compile-single" depends="-post-compile"/>

<target name="-post-compile">
    <copy todir="${build.classes.dir}">
        <fileset dir="resources/">
            <include name="**/**"/>
        </fileset>
    </copy>
</target>

Anytime we compile a single source file, or the complete project, the files from the resources directory are copied to the build/classes directory.

July 28, 2009

Show test failures only in NetBeans 6.7

The Test Results tab in NetBeans has an option to only show failed test methods. This will give a better overview when we are testing and only interested in the methods that fail.

In the left gutter of the Test Results tab we have an icon for showing failures only:

When we click the icon we only see the failed methods for the test class. We focus on these to remove the failures from the test class:

Unit testing with Maven and NetBeans 6.7

The JUnit test runner has improved a lot in NetBeans 6.7. Now we can run single test methods and we get better feedback.

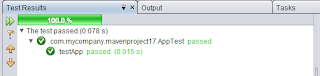
Let's start with a simple Maven project. We go to File | New Project | Maven | Maven Project. We select the Maven Quickstart Archetype (1.0) from the list of archetypes. We fill in all required fields and press the OK button. NetBeans creates a new Maven project in the IDE. The Quickstart Archetype already created a JUnit test class for us, so we can immediately see the new NetBeans JUnit testrunner. We go to Run | Test Project. And in the Test Results tab we get the good news that alls tests have passed:

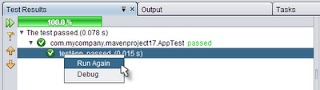
Okay for this example it is pretty obvious, but in NetBeans 6.7 we can right-click on the method name and select Run Again. Now only this method is tested and not the whole class:

We can imagine this is especially useful for methods that do not run successful. Let's add a test method that will fail. We open the AppTest class and add the following method, which will fail during test:

public void testFailure() {
    fail("Deliberate fail...");
}

When we test the class again our Test Results output has changed:

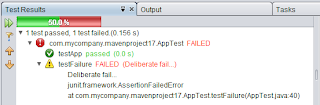
The progress bar is no longer green, we have a 50% green and 50% red part. We also see the testFailure method has failed. The good thing is we can only run the failed method again by right-clicking on the method and selecting Run Again. To go directly to the source code we must right-click on the method and select Go to Source. NetBeans opens the source code file and jumps to the right position in the editor. The Go to Source on a method only works when we create a NetBeans Java project, if we use a Maven project only if we select Go to Source on the class name we jump right to the source code of the test class.

July 2, 2009

Add Maven dependency in NetBeans

Maven support has improved a lot in NetBeans 6.7. One of the small, but important, features is the possibility to add a new dependency to a Maven project. In the previous version of NetBeans we could add a new library, but then we had to know the artifact and group name ourselves. In NetBeans 6.7 we can search for dependencies in the repositories, add an opened project or use the dependency management features of Maven.

To add a new dependency we right-click on the Libraries node of a Maven project and select Add Dependency....

NetBeans opens a dialog window where we can do several things to a dependency to our project. We can fill in the input fields ourselves and choose the scope from the Scope combobox.

But we can also search for a dependency in the repositories. To do this we must type text in the Query input field. The Search Results shows found libraries as we type. We select the library we want and press the OK button to add it to our project.

Instead of using a query we can use the Dependency Management tab. This tab is enabled if our project's POM contains a dependencyManagement section (or the parent POM most likely). The tab shows all available artifacts that are defined in the dependencyManagement. We select the artifact we want to add to our project and press the OK button to add it to our POM.

And finally we can even select the artifact from one of the open Maven projects in NetBeans. If we have more than one Maven project in the Projects window the Open Projects tab of the Add Dependency dialog window is enabled. To add the project's artifact to our POM we select the project and press the OK button.

Generate code with code completion in NetBeans

The code completion for Java in NetBeans 6.7 also includes options for code to be generated. In previous versions we had to use Source | Insert Code..., but now we only have to press Ctrl+Space and we get to see which code can be generated by NetBeans.

Suppose we have the followings simple class:

package javaapplication11;

public class MyObject {
    private String netbeansRules;
}

We press Ctrl+Space (in Windows) to activate code completion (or select Source | Complete Code.... NetBeans shows the code completion popup:

At the top we see the code NetBeans can generate for us. We see constructors, methods to override from java.lang.Object and get/set methods for our property:

We select the option we want to let NetBeans generate the code.

July 1, 2009

Auto popup code completion in NetBeans

In NetBeans 6.7 we can get code completion as we type. Normally we must invoke code completion with Ctrl+Space. To get auto popup code completion we go to Tools | Options | Editor | Code Completion. We select Java from the Language combo box. The option dialog window shows the option Auto Popup on Typing Any Java Identifier Part (What is in a name?). We must select the checkbox to get auto popup code completion.

Now when we write code in the Java editor the code completion popup window shows when we stop typing characters.

Change output font in NetBeans

In the new NetBeans 6.7 we can easily change the font of the output window. We must right-click in the output window and we get a popup menu. We select the option Choose Font... and we get a dialog window where we can choose the font for the output window.

Changing the size of the font is also very easy. If we right-click in the output window we get a popup menu with the options Larger Font and Smaller Font. The default shortcut keys in Windows are Ctrl+Plus and Ctrl+Minus. So if we have a lot of text in the output window and we have good eyes we can make the font really small to get it all in one output window.

June 10, 2009

Force specific locale when working with NetBeans

To my surprise some messages in the NetBeans 6.7 Release Candidate 2 IDE are translated into Dutch. But I want to use the US English locale, because I am used to the English terms.

We can force NetBeans into using a specific locale. First we must open netbeans.conf in the NETBEANS_INSTALL_DIR/etc directory. Then we look for the key netbeans_default_options. We add the following to the options to force NetBeans into using the US English locale:

-J-Duser.language=en -J-Duser.country=US

One of the blog commenters suggests an even easier method to force a specific locale: use the IDE startup parameter --locale. So if we start NetBeans with the following startup parameter we use the US English locale:

$ netbeans --locale en:US

June 4, 2009

Taglib uri suggestions in NetBeans

When we develop web applications with Java Server Pages (JSP) we probably need taglib declartions like this:

<%@ taglib uri="http://java.sun.com/jsp/jstl/core" %>

NetBeans help us with selecting the correct uri attribute value. NetBeans shows a list of suggestions to use for the URI attribute. Besides the standard Sun tag libraries shows NetBeans also tag libraries we defined ourselves in our project:

May 26, 2009

Automatically generate Javadoc skeleton code in NetBeans

NetBeans can help us with generating a starting point for Javadoc documentation. Suppose we have the following simple Java class:

package javaapplication16;

public class Main {

    public static void main(String[] args) {
        final Main app = new Main();
        app.sayHello("mrhaki");
    }

    public void sayHello(final String name) {
        System.out.println("Hello " + name);
    }

}

We right-click on the Sources Packages and select Tools | Analyze Javadoc.

NetBeans generates a list of all sources files with missing javadoc in the Analyzer window:

We select the files and methods and then hit the Fix Selected button to let NetBeans generate skeleton javadoc code:

package javaapplication16;

/**
 * 
 * @author mrhaki
 */
public class Main {

    /**
     * 
     * @param args
     */
    public static void main(String[] args) {
        final Main app = new Main();
        app.sayHello("mrhaki");
    }

    /**
     * 
     * @param name
     */
    public void sayHello(final String name) {
        System.out.println("Hello " + name);
    }

}

Now all we have to do is provide meaningful documentation.

May 20, 2009

Remove trailing spaces in NetBeans

To remove trailing spaces in a source file we go to Source | Remove Trailing Spaces. And that's it.

May 18, 2009

Create new locale properties files with NetBeans

Developing an application with localized messages is something I need to do now and then. Most of the time the messages are defined in a properties file. For each locale we need to create a properties files with the messages. For example if we have a main properties file messages.properties and we want to define messages for the locale nl we must create the file messages_nl.properties. NetBeans supports this scenario with simple commands to quickly create new properties files for different locales.

Suppose we have created a main locale properties file messages.properties. We right-click on the file and select Add | Locale... from the pop-up menu:

NetBeans opens a new dialog window. Here we can select a locale from the list of locales or fill in the correct values ourselves.

When we click the OK button we have a new messages_nl_NL.properties file. In our Project Navigator we can see the new locale as node for the messages.properties file: